Friday, December 31, 2010

Lavender Funnel Swirl


I can't remember where or when I first saw a true funnel swirl done nicely, but the photo stays with me until this day.  I had no idea that it was swirled the funnel style, I just remember scratching my head thinking, "How did she do it?"


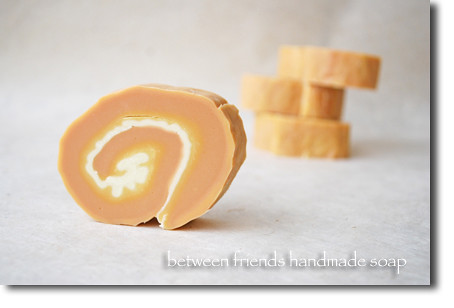
After rehearsing the steps in my head for the hundredth time, I finally got down to business and made my first ever funnel swirl.  Boy it was fun!


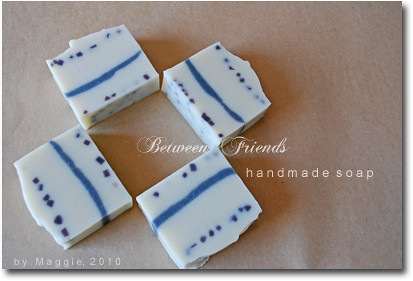
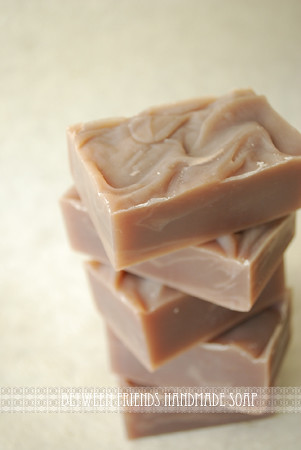
I learned about funnel swirl from this wonderful tutorial by Corrie.  The tricky part, at least to me, is to keep the soap mixture from reaching a thick trace before you finish alternating the colors.  As in all the swirling cases, revealing (or cutting) the soaps is always highly anticipated.  I'm usually quite patient when it comes to cutting my soaps.  I have no problems waiting for over a week before cutting to get that nice clean line that I love.  But this time I just couldn't last for more than 4 days!


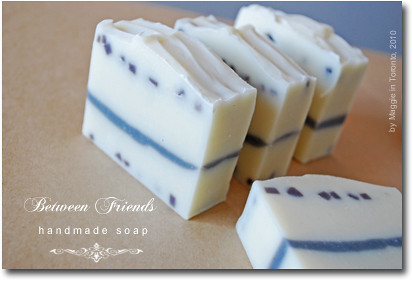
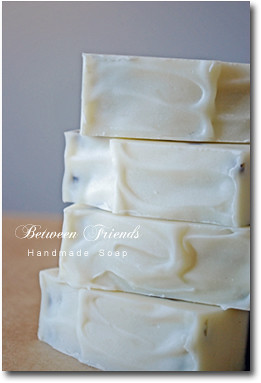
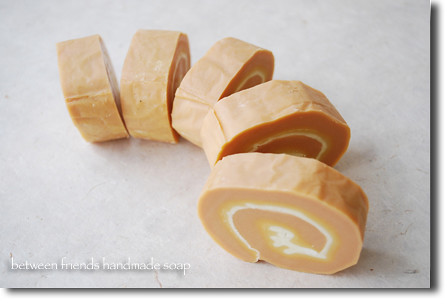
Almost all the cut bars have these "smiles" on them, but the look at the bottom half of this soap is more of the look I was after - more finer and denser lines.  I've worked on my second funnel swirl, which I'll share with you as soon as I have the pictures ready, but I'll definitely need a third attempt to achieve that beautiful look I once saw by the unknown funnel master.


..

Wednesday, December 22, 2010

Rubber Soap Stamps


Remember these soaps I made earlier?

I mentioned using rubber soap stamps I found at Michaels.  Here is what they look like..


They come in a pack of 8, with different designs in different packages.  


All you have to do is place them at the bottom of your mold and pour!   They're easy to come off and leave very clean and crisp designs on your soap.

The only thing I don't like about these is the way they curl up after I remove them from the soap.    Why do they curl?  They do return to their original shape though after I leave them under a heavy box to flatten them out.


Have fun soaping, everyone!


..

Thursday, December 16, 2010

Sweet Orange


How about some warm sunshine already?


The weather has been gloomy and snowy.  Not that I don't like snow - in fact, I LOVE snow! - but the lack of sunshine has been going on way too long.   Not good, not good at all.


So I decided to whip up a batch of bright and sunny soaps, enhanced with my newly-acquired Sweet Orange 5 Fold essential oil.   I remember reading somewhere that Sweet Orange 10 Fold gives you a lasting citrus scent, but 5 fold is the only close one I could get, I decided to give it a try anyway.


These soaps are my very first batch made with Hubby's soap mold!  He was like a broken record for days, "Have you tried your new mold? Have you tried your new mold? Have you....?"  And after I finally made a batch with the new mold, the track became, "Have you unmolded your soap?  Have you unmolded your soap?  Have you...?"


I guess now he knows the excitement I experience every time I make and cut soaps!


The impressions come from the rubber sheets I found at Michael's.  It's kind of tricky working with the fine details because small air pockets get trapped in there if the trace gets too heavy.  I like the look though, and I'll definitely go back to collect more designs for my soaps!


..

Tuesday, December 14, 2010

Angel Award


Thank you Claudia for giving me this award!  Muchas gracias!

I'm both flattered and humbled, and now I'm going to pass the award on to the following wonderful bloggers whose blogs always make me feel warm fuzzy inside:


Happy Holidays everyone!

Wednesday, December 8, 2010

My Early Christmas Gift


This isn't meant to be my Christmas gift, but I'm calling it a gift anyway because I love it so much!


My wonderful Hubby made this mold for me, from design to finish.  I've been talking about how much I'd love to have a wooden mold for my soaps, but for years he never paid much attention to it.  He never prides himself as a handyman or a craftsman.  The only handy work he enjoys doing involves just drilling and hammering.  


One day, out of the blue he turned to me and said, "I'm going to make you a soap mold."


Huh?  Did I miss something?


He began drawing his designs, asking me to show him how big I'd like my soaps to be, and how I'd normally use the mold.   He was really putting in time and thoughts on this!


The final product looks amazing.  He's thought about everything I said and made me a all-in-1 soap mold.  I can use the divider to adjust the size of the mold, or better, create two mold at the same time.  Neat!


After making his first ever wooden mold, Hubby already began to talk about a possible second one.  He couldn't wait for me to use his mold ("Have you tried your new mold?") and he's got all sorts of ideas to make the next one even better!    How wonderful is that!


Wednesday, December 1, 2010

Lavender


It turns out my first batch after getting my soap room back isn't another HP after all.


A very good friend of mine has asked me to make her some soaps scented with lavender essential oil.  Lavender is her favorite and she'd love to give them out as Christmas gifts.


Anchoring natural scents has been every soap maker's ongoing quest.  Some talk about adding the eo before mixing in the lye ("wrapping eo with regular oil to protect it from lye"), some insist that adding the eo after trace helps ("good trace = less lye").    I've tried so many different things but most of the time I can't really tell whether they help or not, but I do find that a well-balanced blend and keeping the soap at a low temperature help retaining the scent.  


I love the blue color this time!  It wasn't meant to be blue, was aiming for purple.  I added some alkanet-infused oil, but then decided to sprinkle in some indigo powder "just in case alkanet doesn't produce enough purple".  I ended up having this beautiful, elegant dark blue, what a lovely surprise!  Doesn't it just add a little bit of mediterranean touch to the soap?


...

Monday, November 1, 2010

Almost There!

It's been.... let's see... three months since hubby and I started our flooring project.  Our place has been in a state of extreme chaos - it's a miracle that we haven't tripped over something on the floor and cursed until we run out of vocabulary.


But I have good news!  Our flooring contractor will be coming in early November and save us from our misery.  Yippee!


My love for making soap has been forced to come to a complete halt because my materials are buried deep in an unknown corner and I don't really have space to cure the cut soaps.  However, I dig out some of the materials and made a small batch two weeks ago for someone at my dentist's office.   She needed some soaps but I didn't have anything for her, so I decided to make her some instead, or so was the excuse I gave myself to make soap again.


I decided to go for HP soap this time partly because I only had a week to make, cut, and wrap the soaps, and partly because I had been thinking about giving it a shot ever since I got Becky's almond soap.


I had so much fun making HP soaps that I know my first pot after getting my soap room back will be another HP too.  Being able to use the soap right away (and clean the tools on the same day) is another incentive.   However, I do notice that HP soaps still can't compare to soaps that have been cured for months, even though their pH level might be similar.  I guess I've been spoiled by nicely cured soaps!


Ok now, what's my next pot going to be?


..

Monday, October 25, 2010

Dirty Dozen

from David Suzuki Foundation

David Suzuki Foundation has recently produced a Dirty Dozen list that names 12 most common but harmful chemicals you can easily find in regular beauty products, including lotions, cosmetics, shampoos, and body washes.


I'm blessed with a very open-minded and smart husband, and it is actually him who educated me about these chemicals years ago.  We got on Cosmetics Database and looked up everything we had in our household.  We were determined to throw out anything that got a hazardous rating of over 3. It turned out that we had nothing safe left to use.


Now, years later, I realize that I don't go down on the body care and cleaning isles in grocery stores, and I automatically skip flyer pages on these products too.   I make my own soaps, I whip up my own lotions, and I just LOVE the way my skin and my hair feel!   No nice fragrance or attractive packaging can ever convince me to go back, because I know my world is more beautiful.


Take the Dirty Dozen challenge and see how pretty your beauty products really are!


..

Monday, October 18, 2010

Soap Stamps - continued

For those of you who are curious to see the final product of an epoxy soap stamp, here are some photos of a stamp I made earlier.


From the top of the stamp

From the side


From the side


Impression on soap


I keep making the same mistake of not making the lines thick enough.  I find that the stamps create the best result with thick and deep lines.  

Have fun creating your own stamps and don't forget to share your work of art with me!


..

Thursday, October 7, 2010

Soap Stamps Anyone?

Before I get carried away, I just want to point out that there are many ways to make soap stamps, and mine is only one of them.  Since there aren't many (or any) Canadian soap stamps sellers, I kind of have to use what I have on hand to make my own.  So feel free to change a little to make it work for you!

~.~.~.~.~.~.~.~.~.~.~.~.~.~.~.~.~


You will need:

   1.  MP soap (or any ugly soaps you've stored out of sight)
   2.  Epoxy (can be found at craft stores)
   3.  sharp carving tools, such as sewing needles or tooth picks
   4.  paper,  tape, scissors
   5.  cotton swap
   6.  a long skewer


I use Easy Cast because it's the only one
I can find here.


~.~.~.~.~.~.~.~.~.~.~.~.~.~.~.~.~


Now let's make some stamps!

1.  Create small MP soap bars for carving.
     I choose to use MP soap because it'll save so much time later when I remove
     the stamp from soap.

2.  Create your design on the soap or copy the design onto it

Just outline your design here, no need to
 worry about perfection yet.


3.  Carve out the lines

Carve and make the lines deeper and wider.
This is a great time to polish on your design.
Use a cotton swap to wipe away loose soap scraps. 


4.  Prepare the soap

Use clear tapes to tape a piece of paper (both 
sides) and wrap the paper around your soap.

     This is a critical step, so make sure you get it right.
     Use clear, plastic tape.
     Be sure to seal the bottom with tapes or else the epoxy will ooze out and make
     a mess of your work space.
     Also make sure that the paper is tall enough to give your stamp a handle.


6.  Mix your Epoxy and pour

Follow the instructions that come in your box.
If you can make soap, you can mix epoxy.

      Since the mixture is quite thick, it's possible that some air gets trapped
      while you pour.
      Take a long skewer to remove any bubbles that are trapped in there.


7.  Wait and reveal!


It usually takes about 24 hours to cure and set. (Again, your instructions will tell you!)  After that, peal off the paper/tape.  Put the whole thing in the microwave and heat it for 10 seconds or until all the MP melts away from the stamp.
If you're using regular CP soap, I only know one way to get the stamp out: clean the soap off!


You might need to do some trimming work to make your stamp even better, but these are the basic steps for you to try.

Have fun everyone!


..

Monday, October 4, 2010

Herbal Shampoo Bar

Have you tried Chinese acupuncture?  Or Chinese herbs?

When I was little, I suffered from severe allergies, and it was Chinese herbs that helped me get my life back to normal.   My very wise mother knows everything there is to know about herbs when it comes to taking care of a family.  I often see medicinal herbs added to our daily meals, or take specific medicine on a specific day for various reasons.  When my brother or I get sick, she'll always brew a huge pot of ginger tea to "chase away the cold", as she'd put it.

The herb I used here is called polygonum multiflorum - sorry for this academic nonsense, I can't find a more commonly used term for it  flowery knotweed.  In Chinese medicine, it's believed to be beneficial to scalps and hair.

Some claim that this herb can slow down the greying process, some believe that it can stop hair loss.  Personally, I haven't reached the point where I have to worry about these two problems (knock on wood!), so I can't really vouch for the claims.   The only reason I add them to my shampoo bars is very simple: it makes me feel good inside.  ;)  I don't know much herbs survive the soaping process, but after finishing using one bar, my hair feels softer and shinier!   But then, it could be the fact that I modified the formula slightly this time..

In any case, I'll be using this herb again!


..

Thursday, September 23, 2010

I Can Be Lucky Too!


That's right!  I can be lucky too!

About a month ago, Becky from The Soap Sister discovered the amazing world of HP soaps and this wonderful almond fragrance from Essential Oil University.   She decided to share her new discoveries, and what better way to share than doing a fun giveaway!

Being someone who's never won anything in her life, I secretly lusted over her wonderful nutty goodies but never expected to win.   When I saw my name on her blog where she announced the winner, I actually double-checked to make sure that it wasn't someone else with the same name!  So thank you, Becky (and Becky's son) for this wonderful surprise! 


Now, after weeks of waiting, the goodies have finally arrived  (yes, it took that long to ship from the States to Canada..).   I have to say, the almond essential oil blend is amazing!  I was in love with it the moment I opened the box, and I couldn't believe how the scent actually stayed with the HP soap.  Even after so many weeks, it still smells delicious.

This soap is definitely one of the best I've ever showed with.  It lathers so well that it can silence anyone who claims that handmade soaps don't lather.  The specs of oatmeal are just another nice touch.  They gently exfoliate but never irritate my skin.  Another thing I love about this bar is its hardness.  The bar never turns soft and sticky after each shower.  All in all, a wonderful soap!


This perfume solid is flavored with the same amazing almond essential oil blend, but it not only smells nutty,  there's also a sweet note of honey from beeswax.   I like how it's in a small bottle so I can bring it with me wherever I go.  When I put it on, the scent always reminds me of almond biscotti!  I guess the only "bad" thing about this perfume solid is that it makes me crave for coffee all the time.


Last but not least, Almond Delight bath salts!

Again, it smells heavenly, best almond fragrance you can ask for.  I haven't had a chance to enjoy it yet, but I do plan to soak myself in a nice tub of hot water with these salts as soon as my exam is over.  I tell myself that this is going to be my reward for studying so hard.  I can just see myself relaxing in the tub with this delicious scent in the air while dumping out everything I've managed to cram into my head.

Thank you, Becky, for these great nutty goodies!!


.

Friday, September 17, 2010

Biting More Than I Can Chew


September has been a busy month for me.

I started a new job, and I decided to go for a big exam at the end of the month.  Both the new job and the exam require lots and lots of studying, and I find myself wishing I was young again.  Oh how much we could learn when we were teenagers!

Having been an "executive personal assistant" to my hubby for many years, getting back to work while studying for a test has proven to be more time-consuming than I originally thought.  I miss taking my time to whip up a nice batch of soap, or testing out a new recipe from the latest magazine issue.

I made these  soap discs a while back, when I still lived in my previous place and had a very small fridge to store all my tallow.  In order to create my perfectly even layers, I opted to heat the soap in the oven (to speed up the hardening process) while I whipped up the next layer.

What I did not anticipate was how heat also expanded those tiny air pockets on the silicon surface.  Those tiny air bubbles gave these discs a sponge-looking texture, and I was so disappointed! I had to take one and run it under the tab to rub off that sponge-looking layer.   Now, that looks better.

I wonder if there's anyone out there who has also experienced the same "bubbling effect" when doing CPOP with silicon molds.. or is it just my mold?

Oh by the way...  Courtney, I still remember my promise to you!  I've postponed my stamp making date till sometime next month ( really need to catch up on all the reading I've managed to procrastinate).  Hopefully when things slowly settle down, I'll be able to sit down and make more stamps!


.

Thursday, September 9, 2010

Not So Pretty


Last weekend is a sad reminder for me that our flooring project has stretched from one long weekend to another - has it really been more than a month?


Hubby and I were so positive that everything would go as planned and we could have our living space back in less than 2 weeks.  Not quite so.   The contractor postponed twice and was impossible to track down.  We decided to go with someone else, and before we knew, we already wasted one month time waiting.


Now that the project has finally started to move ahead, albeit slow, we can at least dream of the day when everything is back to where it belongs.  We moved things out of our bedrooms (my soap room included) in order to work on flooring, and our living and dinning areas are filled with clutter.   I haven't been pleased with the sight, and I guess it shows in my soaps...


I tried swirling, but it didn't come out very pretty.  I tried to create a nice purple color, didn't happen either.  I wanted to give it a nice texture on top, but apparently I need a lot more practice.    But one comforting thing I love about soap making is, no matter how ugly the soap turns out, I know at the end of the day it's still a nice bar of soap I can enjoy in the shower.   Now all it takes is time to transform these babies into something wonderful!
.

Friday, September 3, 2010

Stamping and Cutting


It's been a while since I last made my own soap stamps.  


I started a few projects but somehow never managed to finish them.   Don't you think that sometimes you just need "the right mood" to complete something from start to finish?


I made four stamps this time, two shown here (the words, and the border beneath them) and one shown in the photo below (the rose).  There are other designs I'd like to turn into stamps, but my neck got sore from looking down for hours, and I decided to leave them for next time.  Hopefully it won't be another 2 years.


This rose stamp is a little tricky to use, and I'm still learning the technique to create the best result.  I do find that timing is very important, as well as the soap formula.  But to make my life easier, I think I'll stick to simple lines next time!


I also found some time to make my own soap cutter.  Can you tell that the body / handle of the cutter is actually meant to go on a bag?  A friend of mine generously shared this with me, and the idea of a soap cutter immediately came to my mind.  I've been lusting for a wire soap cutter - really, the soap tool you don't have will always be the better one you have to get!  ;)


To turn this beautiful bag handle into a soap cutter, I simply drilled two holes on each end and used two screws to secure a fish wire.  Now, it might not the best soap cutter in the world, but it could as well be the best looking one!   


I tried using it a few days ago, and it cut through the log nicely.  Almost a little too nicely.  I find it hard to stick to a straight line because it cuts so smoothly that it goes stray when you're not looking.   Better come up with a way to keep my cuts straight....


Saturday, August 28, 2010

A Little Shampoo Talk


I still remember the first time I quit store-bought shampoo and switched to my own shampoo bars.  I did a lot of reading beforehand (because I was unsure of the idea), I kept all my shampoo bottles (just in case!), and I was nervous yet excited to try.


The experience turned out to be an amazing eye opener.  I had no idea that something so simple could made my hair feel so light and "free".  Yes, I had this strange feeling that I just freed my hair from something I didn't even know was there in the first place.  I liked it so much that I threw away all my shampoo bottles because I knew I'd never go back to them!


I'v shared with my friends this new found secret to healthier hair and scalp, and those who are brave enough to take the plunge all love it.  But I usually tell them a little bit about shampoo bars first so that they understand why it feels a certain way and know what to expect.


So this is what I share with my friends before they try my shampoo bars:


square_16.gif  Instructions to using a shampoo bar:  


      1.  Rinse your hair thoroughly with water.  
      2.  Rub the soap bar on your hair until it lathers enough to your liking.
      3.  Rinse off the bubbles.
      4.  Condition your hair with acidic water of your choice (more about this later).
      5.  Rinse off acidic water.
      6.  Dry your hair.


square_16.gif   Store-bought shampoo contains SLS, a type of chemical suds booster, to create bubbles that are always thick and creamy.
    The conditioning "illusion" comes from silicon oils. The only thing they do is coat your hair so they look shiny and smooth.  By coating your hair and scalp, they also trap all the bad chemicals and dirt in there.
   
square_16.gif  On the other hand, shampoo bars are soaps, and soaps are meant to clean, nothing more.  All it guarantees is a clean scalp and hair.


square_16.gif  If you understand how pH level affects your hair, you'll know why your hair tangles up after you rinse off the bubbles.  Since handmade soaps are measured on the alkali half of the scale,  you have to bring the pH level down so your hair returns to its natural pH state. 


square_16.gif The easiest way to do that is rinse your hair with acidic water.  
   Apple cider vinegar has always been recommended as an all natural hair conditioner, and some people prefer lemon juice.  
   Depending on the length of your hair and the hardness of your local water, you might need a different water-to-vinegar ratio, but start with 1 part vinegar and 10 parts water.  I have shoulder length hair, and it takes about 150ml each time to thoroughly rinse my hair.


square_16.gif Some people experience itchy scalps after they switch to handmade shampoo bars.  I call this the "detox stage".  I have no scientific proof to it, but I think it's because the cleaning effects of shampoo bars allow accumulated chemicals a chance to come out.  The itchiness will go away in a week or two.


Give it a try, I'm sure you'll never look at your hair the same way again!


Saturday, August 21, 2010

The Evolution of Swiss Rolls


Hubby's co-worker is expecting a baby girl in four months, and what gift is better than 100% olive oil handmade soap?  

Since I've been planning on making swiss roll soaps, I figured that I could give it a try.  It should be easy, right?  After all, it's just rolling up CP soap.    

Oh I couldn't be more wrong!


This is my first attempt.  My original plan is simply to make 2 layers and roll them up - one with cocoa powder ("chocolate cake") and one with pink clay ("raspberry cream").   But they're both too thick for rolling, and the end result doesn't look like a swiss roll at all.  Rather, it looks like ... I can't even describe what it looks like.


And then there's my second attempt.

I've learned my lesson: keep the layers thin and wait for the soap to set up properly before rolling.

They look a lot like swiss rolls this time, but rolling is still not easy.  I have a hard time keeping the whole thing round, and the surface is not as smooth as I'd like to see.  I'm happy with my second try though.  At least I know what I can do next time to make it even better!


Disqus